Showing posts with label documents. Show all posts

Friday, 31 July 2015

Nuts and bolts part 4 - naming conventions and editors

Named identifiers

Writing and debugging the SQL is not simple and a little bit of clarity becomes a massive help. Adding a prefix to the identifiers gives to the SQL developer a great knowledge about the database schema.


This naming convention makes clear the difference between tables which are physical entities, and the views which are names for saved SQL statement.

Adopting a similar approach for the column names makes the data type immediately recognisable.


Both naming schemas prevent the risk of having reserved keywords used for the identifier's name.

The drawback is if the object type changes. For example if a table becomes a view the name should reflect the change. In an ideal world this shouldn't happen. In the real life building a solid schema design reduces greatly this kind of issues. However, changing the data type, in particular if dealing with big tables, is more complicated than renaming a field and, after all is a DBA problem.

The editor

Unlikely many commercial RDBMS PostgreSQL, ships only with the command line client psql. There is a good quantity of third party clients with good support for the database features and a good connectivity layer. An exhaustive list of those clients can be found on the PostgreSQL wiki
https://wiki.postgresql.org/wiki/Community_Guide_to_PostgreSQL_GUI_Tools. Is difficult to say which editor is the best. When I started learning PostgreSQL the only tool available was PgAdmin 2 and phpPgAdmin. I decided for the former and then I switched to the newer PgAdmin 3 which added a powerful editor and multi platform support. In the years I tested some of the other clients like TOra, SQL workbench and SQL Maestro and I never found the same confidence and ease of usage like PgAdmin 3. Whether is the tool of your choice this should have the following features.

libpq connector

One of the reasons I do not like SQL workbench is the JDBC connector. Writing and testing the SQL code is a quick process. Write the statement, test it, then change it, the test it again and so on. The client response in this method is absolutely important. The libpq connector have virtually no lag, except the disk/network bandwidth.

Removal of the Byte Order Mark (BOM)

The BOM is a marker set in the UTF8 files to determine the byte order. The client psql manages the presence but for some reasons it can fail with an error when running sql scripts with this marker. In PgAdmin 3 is possible to disable the BOM when saving the files.

Wednesday, 22 July 2015

Nuts and Bolts - part 3

INSERT

The INSERT statement is composed by two elements, the attribute list and the values list. The lists are positional. The formatting should mark clearly the various elements of the query in order to make it simpler to spot the correspondence between the attribute and the value.

  • After the words INSERT INTO there is one space followed by the table's name
  • After the table's name there is one carriage return
  • The attributes if present are enclosed between round brackets indented one tab from the word INSERT
  • The attribute's list indents one tab from the round brackets
  • The attributes indent one tab fro the round brackets and are separated by a carriage return
  • The word VALUES indents at the same level of INSERT and is followed by a carriage return
  • The value's list is surrounded by round brackets indented one tab from the word VALUE
  • The values indent one tab fro the round brackets and are separated by a carriage return


UPDATE

The WHERE condition on the update is the same of the SELECT. Take a look to 1.1.1 for more informations. Just after the table's name there is the keyword SET and the list of the updates. The formatting should reflect this particular structure.
  • After the table's name there is one carriage return
  • The word SET indents one tab from the word UPDATE
  • The update's list indents one tab from the word set
  • Each update is separated by a carriage return 


DELETE

The delete is the simplest of the DML as lists just the target relation and the eventual WHERE condition. The formatting is quite simple as the where condition is the only part which requires to be structured as seen in the select.


Data Definition Language

The data definition language groups all the commands defining, altering or dropping the database's relations. Each command type follows a different syntax structure.

CREATE

The create statement is composed by the verb CREATE followed by the object type (e.g. TABLE) and the new relation's name followed by a carriage return. The rest of the statement indents one tab from the verb CREATE.
The rules for the CREATE TABLE are the following.
  • The fields are indented one tab stop from the surrounding brackets
  • Between the field's name and the type there is one or more tab stops
  • The number of tabs is determined by the field with the longest name
  • Between the field's type and the optional DEFAULT there is one space
  • Between the the optional DEFAULT and the optional field's constraint there is one space
  • If the DEFAULT is missing, between the field's type and the field's constraint there is one space
  • Table constraints will require the constraint name followed by one carriage return
  • The constraint type indents one tab from the word CONSTRAINT
  • Any clause indents one tab from the constraint type


The rules for the CREATE VIEW are the following.
  • After the view name there is one carriage return
  • The word AS indents one tab from the verb CREATE
  • The round brackets surrounding the view definition indents at the same level of the word AS
  • The view's SELECT follows the same rules defined in the select.


ALTER

The alter statement's only rule is very simple, all the alter actions indent by one tab fromt he ALTER verb and are separated by a carriage return.

DROP

The drop statement's formatting is very simple. Everything is on a single line.

Saturday, 4 July 2015

Nuts and Bolts - part 2

WITH statements

Because the WITH statement works like having a temporary table, the formatting will follow rules similar to the CREATE TABLE statement.

• Between the WITH and the alias there is a tab followed by the word AS and a carriage return
• The round brackets surrounding the inner query indent one tab from the alias
• The inner query indents one tab from the round brackets


Conclusions 

This coding style is at first sight complex and with some drawback as it can slow down the coding process because of more keystrokes required for the uppercase and the carriage return. However, when the writing automatism is acquired the coding speed is very fast.

This coding style creates the query using a top down structure where the different part of the query are indented in order to reflecting their level inside the query’s logic. This increases the query readability in particular when dealing with complex queries.

The vertical block structure gives great control on the query’s sub sections. With query editors supporting the partial code execution (e.g. pgadmin3’s query ) is possible to highlight the query’s single sections and execute them immediately.

I developed this style from the induction I received in my first DBA job. My employer enforced along the developers and DBA a similar set of rules which worked perfectly, improving the produc- tivity and the code’s consistency across the company.


Incidentally this matches almost perfectly the way PostgreSQL processes a select. What follow is an excerpt of the PostgreSQL’ manual describing how the select is processed.


SELECT retrieves rows from zero or more tables. 
The general processing of SELECT is as follows:

1. All queries in the WITH list are computed.
These effectively serve as temporary tables that can be referenced in the FROM list.
A WITH query that is referenced more than once in FROM is computed only once.
 

2. All elements in the FROM list are computed.
(Each element in the FROM list is a real or virtual table.)
If more than one element is specified in the FROM list, they are cross-joined together.
 

3. If the WHERE clause is specified, all rows that do not satisfy the condition
are eliminated from the output.
 

4. If the GROUP BY clause is specified, or if there are aggregate function calls,
the output is combined into groups of rows that match on one or more values,
and the results of aggregate functions are computed.
If the HAVING clause is present, it eliminates groups that do not satisfy the
given condition.
 

5. The actual output rows are computed using the SELECT output expressions
for each selected row or row group.
 

6. SELECT DISTINCT eliminates duplicate rows from the result.
SELECT DISTINCT ON eliminates rows that match on all the specified expressions.
SELECT ALL (the default) will return all candidate rows, including duplicates.


7. Using the operators UNION, INTERSECT, and EXCEPT, the output of more than one
SELECT statement can be combined to form a single result set.
The UNION operator returns all rows that are in one or both of the result sets.
The INTERSECT operator returns all rows that are strictly in both result sets.
The EXCEPT operator returns the rows that are in the first result set but not in the second.
In all three cases, duplicate rows are eliminated unless ALL is specified.
The noise word DISTINCT can be added to explicitly specify eliminating duplicate rows.
Notice that DISTINCT is the default behavior here, even though ALL is the default for SELECT itself.
 

8. If the ORDER BY clause is specified, the returned rows are sorted in the specified order.
If ORDER BY is not given, the rows are returned in whatever order the system finds fastest to produce.
 

9. If the LIMIT (or FETCH FIRST) or OFFSET clause is specified, the SELECT statement only returns
a subset of the result rows.
 

10. If FOR UPDATE, FOR NO KEY UPDATE, FOR SHARE or FOR KEY SHARE is specified,
the SELECT statement locks the selected rows against concurrent updates.


Thursday, 2 July 2015

Nuts and bolts - part 1

Before starting with the book's topic I want to explain how to set up an efficient environment and some good practice which can improve the code's readability and quality. As somebody will notice these methods are completely opposite to the general code style trends. I'll try to give the motivation for each rule. Anyway, in general because the SQL universe is a strange place this requires strange approach. In order to write and read effectively the SQL the coder should gain the capability to get a mental map between the query's sections and the underlying logic. This can be facilitated using a clear and well defined formatting.

Code formatting

The SQL language is based on statements. Each statement is terminated by a specific character, by default ``;'' . In order to understand the logic of the SQL statements is very important to get the statements formatted in the same way the database executes them. We'll look first how to format the SELECT, then the DML and finally the DDL. Each of those queries needs a different structure because of the different logic. The common formatting rules are the following.
  • There is a tab separator of 7 spaces
  • All the keywords are in upper case
  • After a round bracket there is a carriage return and one tab indented
  • The opening and closing round brackets are indented at the same level 

SELECT

When processing a query the parser works backward. It starts from the innermost and lowest complete statements and moves upward in order to get the entire picture. There is one remarkable exception. The WITH statements are computed first because required in the rest of the query. Actually the WITH acts like a temporary table. In order to see immediately the way PostgreSQL processes the query the indention should follow the same logic.
Basic formatting rules.
  • After the word SELECT there is a carriage return
  • The columns are separated by a comma and a carriage return
  • The columns indent one tab from the respective SELECT
  • The word FROM indents at the same level of SELECT
  • The relation indent one tab from the word FROM
  • The word WHERE indents at the same level of SELECT and FROM
  • A single condition indents one tab from the WHERE
  • Multiple conditions indent two tabs from the where and the logical operators indent one tab from the where
  • Between the logical operators and the condition there is one tab
  • Group by and order by follow the same rules of the select list
  • The queries joined by UNION, INTERSECT, and EXCEPT indent one tab
  • The terminator character indents at the same level of the SELECT,FROM and WHERE
Let's format a simple select from one relation and with one or more condition in the where section.


The first thing to do is to change all the keywords in uppercase.


We'll then format the select list.


Finally  the from and the where.


Having multiple conditions requires an extra tab in order to keep aligned the logical operators and the conditions. 


Joins.
  • If using the implicit joins the relations are separated by a comma and a carriage return, and indented at the same level
  • When using explicit joins specify the kind of join [INNER,LEFT OUTER,CROSS etc.]
  • After the left hand relation there is a carriage return
  • The join clause indents at the same level of the left hand relation
  • After the words [INNER,LEFT OUTER,CROSS] JOIN follows the relation's name and a carriage return
  • The word ON indents one tab from the JOIN and there is a carriage return
  • The join conditions follow the same rules of the WHERE condition
  • Nested joins indent one tab from the upper join
  • The usage of the aliases, with the optional word AS is strongly encouraged 
Query with implicit join 


Query with explicit inner join


Subqueries
  • All the subqueries will indent one tab from the surrounding brackets
  • If the subquery is short in can stay in line with the round brackets (e.g. SELECT now())
Query with subselect in the SELECT's list


Query with subselect in the FROM's list


Wednesday, 4 February 2015

The memory

The PostgreSQL memory at first sight looks simple. If compared with the complex structures implemented in the other DBMS to a careless reader could seem rudimentary. However, the memory and in particular the shared buffers implementation is complex and sophisticated. This chapter will dig down deep into the PostgreSQL's memory.

3.1 The shared buffer

The shared buffer is a segment allocated at cluster's startup. Its size is determined by the GUC parameter shared_buffers and the size can be changed only restarting the cluster. The shared buffer is used to manage the data pages as seen in 2.6, which are called buffers when loaded in rhw memory. Having a RAM segment is not uncommon in the database universe. Is a rapid exchange area where the buffers are kept across the sessions and keeps the data near the CPU. Like his competitors PostgreSQL strives to keep in memory what is important things and not everything. In the era of the in memory databases this could seems an obsolete concept. Unfortunately the truth is that the resources, and so the money, are not infinite. Before digging into the technical details we'll have a look to the history of the memory manager. The way PostgreSQL sticks an elephant into a small car without Timelord technology.

Back in the old days PostgreSQL was quite rudimentary. The version 7.4 did not had the tablespaces, it was without a mechanism to prevent the XID wraparound failure (except the routine vacuuming of course) and the memory  manager was a simple LRU buffer. Since then the algorithm evolved to become a simple but sophisticated system to cache effectively the buffers. We'll look briefly to the memory manager's history.

Thursday, 29 January 2015

The cluster in action - part 2

2.4 The background writer

Before the spread checkpoints the only solution to ease down the IO spike caused by the checkpoint was to tweak the background writer. This process were introduced with the revolutionary PostgreSQL 8.0. The writer, as the name suggests, works in the background searching for dirty buffers to write on the data files. The writer works in rounds. When the process awakes scans the shared buffer for dirty buffers. When the amount of buffers cleaned reaches the value set in bgwriter_lru_maxpages the process sleeps for the time set in bgwriter_delay.

2.5 The autovacuum

The routine vacuuming is an important task to prevent the table bloat and the dreaded XID wraparound failure. If enabled the autovacuum launcher starts one daemon for each relation with enough dead tuples to trigger the conditions set in autovacuum_vacuum_threshold and autovacuum_vacuum_scale_factor. An autovacuum daemon is a normal backend and appears in the view pg_stat_activity. Because the XID wraparound failure is a really serious problem, the autovacuum to prevent wraparound starts even if the autovacuum is turned off.

2.6 The backends

The PostgreSQL backend architecture is the brilliant solution to a nasty problem. How to guarantee the buffers are read only by one session at time and avoid the bottleneck of a long waiting queue. When a backend needs to access a particular tuple, either for read or write, the relation's pages are accessed to find the tuple matching the search criteria. When a buffer is accessed then the backend sets a pin on the buffer which prevents the other backends requiring the same page to wait. As soon as the tuple is found and processed the pin is removed. If the tuple is modified the MVCC enforces the tuple's visibility to the other backends. The process is fine grained and very efficient. Even with an high concurrency rate on the same buffers is very difficult to have the backends entangled.
A backend process is a fork of the main postgres process. It's very important to understand that the backend is not the connection but a server process which interacts with the connection. Usually the backend terminates when the connection disconnects. However, if a client disconnects ungracefully meanwhile a query is running without signalling the backend, the query will continue only to find there's nothing listening on the other side. This is bad for many reasons. First because is consuming a connection slot for nothing. Also the cluster is doing something useless consuming CPU cycles and memory.

Like everything in PostgreSQL the backend architecture is oriented to protect the data and in particular the volatile shared buffer. If for some reasons one of the backend process crashes then the postgres process terminates all the backends in order to prevent the potential shared buffer corruption. The clients should be able to manage this exception resetting the connection.


2.7 Wrap up

The cluster's background activity remains most of the time unnoticed. The users and developers can mostly ignore this aspect of the PostgreSQL architecture leaving the difficult business of understanding the database heartbeat to the DBA, which should have the final word on any potential mistake in the design specs. The next chapters will explore the PostgreSQL's architecture in details, starting with the memory.

Monday, 26 January 2015

The cluster in action - part 1

The cluster in action

PostgreSQL delivers his services ensuring the ACID rules are enforced at any time. This chapter will give an outlook of a ``day in the life'' of a PostgreSQL's cluster. The chapter approach is purposely generic. At this stage is very important to understand the global picture rather the technical details.

After the startup

When the cluster completes the startup procedure it starts accepting the connections. When a connection is successful then the postgres main process forks into a new backend process which is assigned to the connection for the connection's lifetime. The fork is quite expensive and does not work very well for a high rate of connection's requests. The maximum number of connections is set at startup and cannot be changed dynamically. Whether the connection is used or not for each connection slot are consumed 400 bytes of shared memory.
Alongside the client's request the cluster have several subprocesses working in the background.

The write ahead log

The data pages are stored into the shared buffer either for read and write. A mechanism called pinning ensures that only one backend at time is accessing the requested page. If the backend modifies the page then this becomes dirty. A dirty page is not yet written on its data file. However the page's change is first saved on the write ahead log as WAL record and the commit status for the transactions is then in the directory clog or the directory pg_serial, depending on the transaction isolation level. The wal records are stored into a shared buffer's area sized by the parameter wal_buffers before the flush on disk into the pg_xlog directory on fixed length segments. When a WAL segment is full then a a new one is created or recycled. When this happens there is a xlog switch. The writes on the WAL are managed by a background process called WAL writer. This process were first introduced with PostgreSQL 8.3.

The checkpoint

The cluster, on a regular basis, executes an important activity called checkpoint. The frequency of this action is governed by the time and space, measured respectively in seconds and log switches between two checkpoints. The checkpoint scans the shared buffer and writes down to the data files all the dirty pages. When the checkpoint is complete the process determines the checkpoint location and writes this information on the control file stored into the cluster's pg_global tablespace. In the case of unclean shutdown this value is used to determine the WAL segment from where to start the crash recovery.
Before the version 8.3 the checkpoint represented a potential bottleneck because the unavoidable IO spike generated during the writes. That's the reason why the version 8.3 introduced the concept of spread checkpoints. The cluster aims to a particular completion target time measured in percent of the checkpoint timeout. The default values are respectively 0.5 and 5 minutes. This way the checkpoint will spread over a target time of 2.5 minutes. From PostgreSQL 9.2 a new checkpointer process has been created to manage efficiently the checkpoint.

Tuesday, 16 September 2014

Book done!

The book is now complete. There's still a lot to do for reviewing the writing and fixing the bad grammar. Anyway is about 107 pages and I'm pretty satisfied. I've worked on this document for 4 months in my spare time and I became more confident with my English during the  writing.

So, what's next? I'll spend the next couple of weeks reviewing and fixing the book. After that I'll put the pdf  on lulu.com free for download and in hardcopy. The latter will have a production/shipping cost of course. I'll also put the mobi version on amazon for kindle distribution. Unfortunately amazon doesn't allow free books. I'll put the minimum price possible 0.99$. Anyway if anybody wants the mobi for free just give me a shout.


I've already started the second volume. This one will cover the PostgreSQL's advanced topics like the memory manager and the HA.


And now there are the final two sections. The restore performance and the dba advice.


Restore performances

When restoring a database, in particular in a disaster recovery scenario, the main goal is to have the data back on line as fast as possible. Usually the data section's restore is fast. If the dump has been taken using the copy statements, which are enabled by default, the reload requires a fraction of the entire restore's time. Taking the advantage of the parallel jobs, available for the custom and directory format, it's still possible to improve the data section's reload.

The other face of the coin is the post-data section. Because the objects in this section are mostly random access operations, the completion can require more time than the data section itself; even if the size of the resulting objects is smaller than the table's data. This happens because the unavoidable sort operations are CPU and memory bound. The parallel restore gives some advantage, but as seen in 10.2 each loop's process is single threaded.

Setting up an emergency postgresql.conf file can speed up the restore, reducing the time up to 40% than the production's configuration. What it follows assumes the production's database is lost and the data is restored from a custom format's backup.

shared_buffers

When reloading the data from the dump, the database performs a so called bulk load operation. The PostgreSQL's memory manager have a subroutine which protects the shared segment from the block eviction caused by IO intensive operations. It's then very likely the ring buffer strategy will be triggered by the restore, sticking the IO in a small 4 MB buffer protecting the rest of the memory. A big shared buffer it can cache the data pages when in production but becomes useless when restoring. A smaller shared buffer, enough to hold the IO from the restore processes will result in more memory available for the backends when processing the post-data section. There's no fixed rule for the sizing. A gross approximation could be 10 MB for each parallel job with a minimum cap of 512 MB.

wal_level

The wal_level parameter sets the level of redo informations stored in the WAL segments. By default is set to minimal, enabling the xlog skip. Having the database in with a standby, or simply using the point in time recovery as alternate backup strategy requires the parameter to be set to archive or hot_standby. If this is the case and you have a PITR or standby to failover, stop reading this book and act immediately. Restoring from a physical backup is several time faster than a logical restore. If you have lost the standby or PITR snapshot then before starting the reload the wal_level must be set to minimal.

fsync

Turning off fsync can improve massively the restore's speed. Having this parameter turned off is not safe, unless the cache is have the backup battery to prevent data loss in case of power failure. However, even without the battery at restore time having the fsync off is not critical. After all the database is lost, what else can happen?

checkpoint_segments, checkpoint_timeout

The checkpoint is a vital event in the database activity. When occurs all the pages not yet written to the data files are synced to disk. This in the restore context is a disturbance. Increasing the checkpoint segments and the timeout to the maximum allowed values will avoid any extra IO. In any case the dirtied blocks will be written on disk when the buffer manager will need to free some space.

autovacuum

There's no point in having vacuumed the tables after a complete reload. Unfortunately autovacuum does not know if a table is being restored. When the limit for the updated tuples is recognised the daemon starts a new process wasting precious CPU cycles. Turning off temporarily the setting will let the backends to stay focused on the main goal. The data restore.

max_connections

Limiting the max connections to number of restore jobs is a good idea. It's ok also giving a slight headroom for one or two connections, just in case there's need to log in and check the database status. This way the available memory can be shared efficiently between the backends.

maintenance_work_memory

This parameter affects the index builds which are stored in the restore's post-data section. Low values will results in the backends sorting on disk and slowing down the entire process. Higher values will keep the index build in memory with great speed gain. The value should be carefully sized keeping in mind the memory available on the system. This value should be reduced by a 20% if the total ram is up to 10 GB and by 10% if bigger. This reduction is needed to consider the memory consumed by the operating system and the other processes. From the remaining ram must be subtracted the shared_buffer's memory. The remaining value must be divided by the expected backends to perform the restore. For example if we have a system with 26GB a shared_buffer of 2 GB and 10 parallel jobs to execute the restore, the maintenance_work_mem is 2.14 GB.
26 - 10% =  23.4
23.4 - 2 = 21.4
21.4 / 10 = 2.14
Ignoring this recommendation can trigger the swap usage resulting in a slower restore process.


Get DBA advice

The database administration is weird. It's very difficult to explain what a DBA does. It's a job where the statement ``failure is not an option" is the rule number zero. A DBA usually works in antisocial hours, with a very limited time window. A DBA holds a lot on the shoulders and that's the reason why those people can seem hostile or living in their own world.
Despite the strange reputation, a database expert is an incredible resource for building up efficient and scalable designs. Nowadays is very simple to set up a PostgreSQL instance. Even with the default configuration parameter the system is so efficient that basically doesn't show any problem when running at low or medium load. If this, at first sight, seems a fantastic feature actually is a really bad thing. Any mistake at design level is hidden and when the problem sooner or later appears is too late.

This final advice is probably the most important of the entire chapter. If you have a DBA don't be shy. Ask for any suggestion, even if the solution seems obvious or if the task is small. The database layer is a completely different universe. A small mistake can result in a very big problem.

Of course if there's no DBA, that's bad. Never sail without a compass. Never start a database project without an expert. A professional to take care of the most important part, the foundations.

If this is the case, ask your employer to hire a PostgreSQL DBA as soon as possible.

Sunday, 7 September 2014

Chapter 6 final parts. Foreign, check and null constraints


Foreign keys

A foreign key is a constraint enforced using the values another table's field. The classical example is the tables storing the addresses and cities. We can store the addresses with the city field, inline.


Being the city a duplicated value over many addresses, this will cause the table bloat by storing long strings, duplicated many and many times, alongside with the the address. Defining a table with the cities and referencing the city id in the addresses table will result in a smaller row size.


When dealing with referencing data, the main concern is the data consistency between the tables. In our example, putting an invalid identifier for the city in the t_addresses table will result missing data when joining. The same result will happen if for any reason the city identifier in the t_cities table is updated.

The foreign keys are designed to enforce the referential integrity. In our example will we'll enforce a strong relationship between the tables.


The key is enforced in two ways. When a row with an invalid i_id_city hits the table t_addresses the key is violated and the transaction aborts. Deleting a city from the t_cities table which id is referenced in the t_addresses, will violate the key. The same will updating a i_id_city referenced in the t_addresses.

The enforcement is performed via triggers. The pg_dump or pg_restore option -disable-trigger will permit the the data restore with the schema already in place. For more informations take a look to 9 and 10.

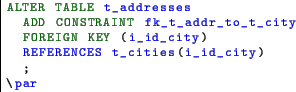
The FOREIGN KEYS have been enriched with an handful of options which make them very flexible. The referenced table can drive actions on the referencing using the two options ON DELETE and ON UPDATE. By default the behaviour is to take NO ACTION if there are referencing rows until the end of the transaction. This is useful if the key check should be deferred to the end of the transaction. The other two actions are the RESTRICT which does not allow the deferring and the CASCADE which cascade the action to the referred rows.
If we want our foreign key restrict the delete with no deferring and cascade any update, here's the DDL.


Another very useful clause available with the foreign and check constraints is the NOT VALID. When the constraint is created with NOT VALID, the initial check is skipped making the constraint creation instantaneous. This is acceptable if the actual data is consistent. The constraint is then enforced for all the new data. The invalid constraint can be validated later with the command VALIDATE CONSTRAINT.


Check constraints

A check constraint is a user defined check to enforce specific condtions on the rows. The definition can be a condition or a used defined function. In this case the function must return a boolean value. As for the foreign keys, the check accepts the NOT VALID clause to speed up the creation.

The check is satisfied if the condition returns true or NULL. This behaviour can produce unpredictable results if not fully understood. An example will help to clarify. Let's create a CHECK constraint on the v_address table for enforcing a the presence of a value. Even with the check in place the insert without the address completes successfully.


This is possible because the v_address does not have a default value and accepts the NULL values. The check constraint is violated if, for example we'll try to update the v_address with the empty string.


Our check constraint will work as expected if we set for the v_address field a fallback default value.


Please note the existing rows are not affected by the default value change.
The message for the update and the insert is exactly the same because PostgreSQL attempts to create a new row in both cases. When the constraint fails the transaction is rolled back leaving the dead row in place. We'll take a better look to the MVCC in 7.6.

Not null

For people approaching the database universe the NULL value can be quite confusing. A NULL value is an empty object without any type or meaning. Actually when a field is NULL it doesn't consumes physical space. By default when defining a field this is NULLable. Those fields are quite useful to omit some columns, for example, at insert time.
The NULLable fields can be enforced with an unique constraint as the NULL are not considered as duplicates. When dealing with the NULL it's important to remind the NULL acts like the mathematical zero. When evaluating an expression with a NULL, the entire expression becomes NULL.
The NOT NULL is a column constraint which forbids the presence of NULL in the affected field. Combining a NOT NULL with a unique constraint is exactly like having enforced a PRIMARY KEY. When altering a field the table is scanned for validation and the constraint's creation is aborted if any NULL value is present on the affected field.

For example, if we want to add the NOT NULL constraint to the field v_address in the t_addresses table the command is just.


In this case the alter fails because the column v_address contains NULL values from the example seen in 6.4. The fix can be performed in a single query using the coalesce function. This function returns the first not null value from the left. This way is possible to change the v_address on the fly to a fixed placeholder .


Adding new columns with NULL is quick. PostgreSQL simply adds the new attribute in the system catalogue and manages the new tuple structure considering the new field as empty space. Adding a field with NOT NULL requires the presence of the DEFAULT value as well. This is an operation to consider carefully when dealing with big amount of data. This way the table will be locked in exclusive mode and a complete relation's rewrite will happen. A far better way is to add a NOT NULL field is to add at first as NULLable field. A second alter will add the default value to have the new rows correctly set. An update will then fix the NULL values without locking the table. Finally the NOT NULL could be enforced without hassle.

Monday, 25 August 2014

The missing chapter 6 part 1 and two, data integrity

I've started the sixth chapter, the one on the data integrity I've forgotten. There are the first two parts alongside with the introduction. I've also updated the book on slideshare with the new cover and the last incomplete chapter for the developers. The beautiful cover is made by Chiaretta & Bon. Kudos and many thanks.

I've also uploaded the latex sources on github for anybody to fork and review my crappy english. My former colleague and friend Craig Barnes already started reviewing the tex files, many thanks for the priceless help.


Here's the github repository url : https://github.com/the4thdoctor/pgdba_books

Data integrity

There's just one thing worse than losing the database. Having the data set full of rubbish. The data integrity has been part of PostgreSQL since the beginning. It offers various levels of strength ensuring the data is clean and consistent. In this chapter we'll have a brief look to the various constraints available. The PostgreSQL's constraints can be grouped in two kind. The table constraints and the column constraints. The table constraints are defined on the table's definition after the field's list. The column constraints appear in the field's definition after the data type. Usually for the primary keys and the unique keys the definition is written as table constraint.
The constraint applies the enforcement to any table's row without exclusion. When creating a table constraint on a fully populated table the data is validated first. Any validation error aborts the constraint creation. However, the foreign keys and check constraints accept the clause NOT VALID. With this clause the database assumes the data is valid and skips the validation. The cration is almost immediate. The new constraint is then enforced only for the new data. When using this option the data must be consistent.

Primary keys

A primary key is the unique row identifier. Having this constraint enforced ensures the row can be addressed directly using the key value. A primary key can be enforced on a single or multi column. The data aspect must be unique with the strictest level. That means the NULL values are not permitted in columns participating to the primary key. When creating a primary key this implicitly adds a new unique index on the affected fields. In order to avoid the exclusive lock on the affected table the unique index can be built before the primary using the CONCURRENTLY clause and then used in the primary key definition as shown in 8.3. Using the primary key is the fastest way to access the table's contents.
There is the primary key definition as table and column constraint.


With the table's constraint definition is possible to specify the constraint name and to have a multi column constraint. When writing a multi column constraint the participating columns should be listed separate by commas.

The most common primary key implementation, and probably the best, is to have a serial column as primary key. A serial field is short for integer NOT NULL which default value is associated to the nextval for an auto generated sequence. Because the sequence have its upper limit to the bigint upper limit, this ensures the data does not wraps in the table's lifetime. In the case the primary key is expected to reach the value of 2,147,483,647 the type of choice should be bigserial rather serial. This will create the primary key's field as bigint which upper limit is 9,223,372,036,854,775,807.

However it's still possible to alter the field later in order to match the new requirements. Because changing the data type requires a complete table's rewrite, any view referencing the affected column will abort the change.

Here's the t_data's type change output with the client message level set to debug3.


Dealing with a big amount of data presents also the problem to have enough space for fitting twice of the original table plus the downtime caused by the exclusive lock on the affected relation. A far better approach is to add a new bigint NULLable column without default value. Setting up a trigger for the inserts will keep in sync the new values with the original primary key. Then an update procedure will set the value for the rows. This should run in small batches to avoid to overfill the pg_xlog directory with long running transactions. When everything is in place the new column could then become NOT NULL and a unique index will finally enforce the uniqueness for the new field.

The primary key can then be dropped and recreated using the new unique index. This is permitted only if there's no foreign key referencing the field. In this case a multi drop and create statement is required. The final cleanup should include the trigger's drop and the old primary key removal. Any view using the old primary key should be rebuilt before the drop.

Unique keys

The unique keys are similar to the primary keys. They enforce the uniqueness using an implicit index but they allow the presence of NULL values. Their usage is for enforcing uniqueness on columns not used as primary key. Similar to the primary key the unique constraints are based on a unique index. In fact there's little difference between the unique index and the unique key except the presence of the latter in the system table pg_constraint.

Sunday, 17 August 2014

Chapter 10 part 2 - The binary formats

The three binary formats supported by pg_dump are the custom, the directory and the tar format. The first two can be accessed randomly by the restore program and have the parallel restore support, being the best choice for having a flexible and reliable restore. Before the the 9.3 the only format supporting the parallel restore was the custom. With this version the directory format accepts the -j switch. This feature, combined with the parallel dump seen in 9.3 is a massive improvement for saving big amount of data. The tar format does have the limit of 12 GB in the archive's file size and doesn't offer the parallel restore nor the selective restore.

The custom format is a binary archive with a table of contents pointing the various archive sections. The directory format is a directory which name is the value provided with the -f switch. The directory contents are a toc.dat file, where the table of contents and the schema are stored. For each table there is a gzip file which name is a number corresponding to the toc entry for the saved relation. Those files store the data restore for the relation.

The restore from the binary formats requires the pg_restore usage. Because almost all the pg_dump's switches are supported by pg_restore we'll not repeat the look out. Take a look to 9.1 for the switch meanings. Anyway this is the pg_restore's help output.

pg_restore restores a PostgreSQL database from an archive created by pg_dump.

Usage:
  pg_restore [OPTION]... [FILE]

General options:
  -d, --dbname=NAME        connect to database name
  -f, --file=FILENAME      output file name
  -F, --format=c|d|t       backup file format (should be automatic)
  -l, --list               print summarized TOC of the archive
  -v, --verbose            verbose mode
  -V, --version            output version information, then exit
  -?, --help               show this help, then exit

Options controlling the restore:
  -a, --data-only              restore only the data, no schema
  -c, --clean                  clean (drop) database objects before recreating
  -C, --create                 create the target database
  -e, --exit-on-error          exit on error, default is to continue
  -I, --index=NAME             restore named index
  -j, --jobs=NUM               use this many parallel jobs to restore
  -L, --use-list=FILENAME      use table of contents from this file for
                               selecting/ordering output
  -n, --schema=NAME            restore only objects in this schema
  -O, --no-owner               skip restoration of object ownership
  -P, --function=NAME(args)    restore named function
  -s, --schema-only            restore only the schema, no data
  -S, --superuser=NAME         superuser user name to use for disabling triggers
  -t, --table=NAME             restore named table(s)
  -T, --trigger=NAME           restore named trigger
  -x, --no-privileges          skip restoration of access privileges (grant/revoke)
  -1, --single-transaction     restore as a single transaction
  --disable-triggers           disable triggers during data-only restore
  --no-data-for-failed-tables  do not restore data of tables that could not be
                               created
  --no-security-labels         do not restore security labels
  --no-tablespaces             do not restore tablespace assignments
  --section=SECTION            restore named section (pre-data, data, or post-data)
  --use-set-session-authorization
                               use SET SESSION AUTHORIZATION commands instead of
                               ALTER OWNER commands to set ownership

Connection options:
  -h, --host=HOSTNAME      database server host or socket directory
  -p, --port=PORT          database server port number
  -U, --username=NAME      connect as specified database user
  -w, --no-password        never prompt for password
  -W, --password           force password prompt (should happen automatically)
  --role=ROLENAME          do SET ROLE before restore

If no input file name is supplied, then standard input is used.

Report bugs to <pgsql-bugs@postgresql.org>.
If the database connection is omitted pg_restore sends the output to the standard output. The switch -f sends the output to a filename though. This is very useful if we want to check the original dump file is readable, executing a restore onto the /dev/null device.
The the custom and directory formats show their power when restoring on a database connection in a multi core system. Using the -j switch it's possible to specify the number of parallel jobs for the data and the post data section. This can improve massively the recovery time, running the most time consuming actions in multiple processes.

The word parallel can be confusing in some way. PostgreSQL does not supports multithreading. That means each backend process will use just only one cpu. In this context, each job take care of a different area of the restore's table of contents, The TOC is split in many queues with a fixed object list to process. For example one queue will contain the data restoration for a table, and the relation's indices and constraints.

The switch -section offers a fine grain control on which section of the archived data will be restored. In a custom and directory format there are three distinct sections.
  • pre-data This section restores only the schema definitions not affecting the speed and reliability of the data restore. e.g. table's DDL, functions creation, extensions, etc.
  • data The data restore itself, by default saved as COPY statements to speed up the process
  • post-data This section runs the restore for all the objects enforcing the data integrity, like the primary and foreign keys, triggers and the indices which presence during the restore slow down the data reload massively.
The switch -C creates the target database before starting the restoration. To do this the connection must happen first on another database.

We'll now will see how to restore the database seen in 10.1 in the same two steps approach, using the custom format.

Let's start with a complete database dump using the custom format.
postgres@tardis:~/dump$ pg_dump -Fc -f db_addr.dmp  db_addr
pg_dump: reading schemas
pg_dump: reading user-defined tables
pg_dump: reading extensions
pg_dump: reading user-defined functions
pg_dump: reading user-defined types
pg_dump: reading procedural languages
pg_dump: reading user-defined aggregate functions
pg_dump: reading user-defined operators
pg_dump: reading user-defined operator classes
pg_dump: reading user-defined operator families
pg_dump: reading user-defined text search parsers
pg_dump: reading user-defined text search templates
pg_dump: reading user-defined text search dictionaries
pg_dump: reading user-defined text search configurations
pg_dump: reading user-defined foreign-data wrappers
pg_dump: reading user-defined foreign servers
pg_dump: reading default privileges
pg_dump: reading user-defined collations
pg_dump: reading user-defined conversions
pg_dump: reading type casts
pg_dump: reading table inheritance information
pg_dump: reading event triggers
pg_dump: finding extension members
pg_dump: finding inheritance relationships
pg_dump: reading column info for interesting tables
pg_dump: finding the columns and types of table "t_address"
pg_dump: finding default expressions of table "t_address"
pg_dump: finding the columns and types of table "t_city"
pg_dump: finding default expressions of table "t_city"
pg_dump: flagging inherited columns in subtables
pg_dump: reading indexes
pg_dump: reading indexes for table "t_address"
pg_dump: reading indexes for table "t_city"
pg_dump: reading constraints
pg_dump: reading foreign key constraints for table "t_address"
pg_dump: reading foreign key constraints for table "t_city"
pg_dump: reading triggers
pg_dump: reading triggers for table "t_address"
pg_dump: reading triggers for table "t_city"
pg_dump: reading rewrite rules
pg_dump: reading large objects
pg_dump: reading dependency data
pg_dump: saving encoding = UTF8
pg_dump: saving standard_conforming_strings = on
pg_dump: saving database definition
pg_dump: dumping contents of table t_address
pg_dump: dumping contents of table t_city
We'll use a second database for the restore.


We'll then restore just the schema using the following command.
postgres@tardis:~/dump$ pg_restore -v -s -d db_addr_restore_bin db_addr.dmp 
pg_restore: connecting to database for restore
pg_restore: creating SCHEMA public
pg_restore: creating COMMENT SCHEMA public
pg_restore: creating EXTENSION plpgsql
pg_restore: creating COMMENT EXTENSION plpgsql
pg_restore: creating TABLE t_address
pg_restore: creating SEQUENCE t_address_i_id_addr_seq
pg_restore: creating SEQUENCE OWNED BY t_address_i_id_addr_seq
pg_restore: creating TABLE t_city
pg_restore: creating SEQUENCE t_city_i_id_city_seq
pg_restore: creating SEQUENCE OWNED BY t_city_i_id_city_seq
pg_restore: creating DEFAULT i_id_addr
pg_restore: creating DEFAULT i_id_city
pg_restore: creating CONSTRAINT pk_i_id_city
pg_restore: creating CONSTRAINT pk_id_address
pg_restore: creating FK CONSTRAINT fk_t_city_i_id_city
pg_restore: setting owner and privileges for DATABASE db_addr
pg_restore: setting owner and privileges for SCHEMA public
pg_restore: setting owner and privileges for COMMENT SCHEMA public
pg_restore: setting owner and privileges for ACL public
pg_restore: setting owner and privileges for EXTENSION plpgsql
pg_restore: setting owner and privileges for COMMENT EXTENSION plpgsql
pg_restore: setting owner and privileges for TABLE t_address
pg_restore: setting owner and privileges for SEQUENCE t_address_i_id_addr_seq
pg_restore: setting owner and privileges for SEQUENCE OWNED BY t_address_i_id_addr_seq
pg_restore: setting owner and privileges for TABLE t_city
pg_restore: setting owner and privileges for SEQUENCE t_city_i_id_city_seq
pg_restore: setting owner and privileges for SEQUENCE OWNED BY t_city_i_id_city_seq
pg_restore: setting owner and privileges for DEFAULT i_id_addr
pg_restore: setting owner and privileges for DEFAULT i_id_city
pg_restore: setting owner and privileges for CONSTRAINT pk_i_id_city
pg_restore: setting owner and privileges for CONSTRAINT pk_id_address
pg_restore: setting owner and privileges for FK CONSTRAINT fk_t_city_i_id_city
The dump file is specified as last parameter. The -d switch tells pg_restore which database to connect for the restore. By default the postgres user usually connects using the ident operating system daemon or the trust authentication method, when connected as local. That's the reason why in this example there's no need of specifying the username or enter the password.

The second restore's step is the data load. In the example seen in 10.1 we used the pg_dump with -disable-triggers switch in order to avoid failures caused by constraint violation. With the custom format the switch is used at restore time.
postgres@tardis:~/dump$ pg_restore --disable-triggers -v -a -d db_addr_restore_bin db_addr.dmp 
pg_restore: connecting to database for restore
pg_restore: disabling triggers for t_address
pg_restore: processing data for table "t_address"
pg_restore: enabling triggers for t_address
pg_restore: executing SEQUENCE SET t_address_i_id_addr_seq
pg_restore: disabling triggers for t_city
pg_restore: processing data for table "t_city"
pg_restore: enabling triggers for t_city
pg_restore: executing SEQUENCE SET t_city_i_id_city_seq
pg_restore: setting owner and privileges for TABLE DATA t_address
pg_restore: setting owner and privileges for SEQUENCE SET t_address_i_id_addr_seq
pg_restore: setting owner and privileges for TABLE DATA t_city
pg_restore: setting owner and privileges for SEQUENCE SET t_city_i_id_city_seq
However, this approach does not prevent the slowness caused by the indices when reloading the data. If a restore with multiple steps is required (e.g. creating the database schema and check all the relations are in place before starting) the section switch is a better choice. Let's see how it works with the example seen before.

We'll first restore the pre-data section10.1.
postgres@tardis:~/dump$ pg_restore --section=pre-data -v  -d db_addr_restore_bin db_addr.dmp 
pg_restore: connecting to database for restore
pg_restore: creating SCHEMA public
pg_restore: creating COMMENT SCHEMA public
pg_restore: creating EXTENSION plpgsql
pg_restore: creating COMMENT EXTENSION plpgsql
pg_restore: creating TABLE t_address
pg_restore: creating SEQUENCE t_address_i_id_addr_seq
pg_restore: creating SEQUENCE OWNED BY t_address_i_id_addr_seq
pg_restore: creating TABLE t_city
pg_restore: creating SEQUENCE t_city_i_id_city_seq
pg_restore: creating SEQUENCE OWNED BY t_city_i_id_city_seq
pg_restore: creating DEFAULT i_id_addr
pg_restore: creating DEFAULT i_id_city
pg_restore: setting owner and privileges for DATABASE db_addr
pg_restore: setting owner and privileges for SCHEMA public
pg_restore: setting owner and privileges for COMMENT SCHEMA public
pg_restore: setting owner and privileges for ACL public
pg_restore: setting owner and privileges for EXTENSION plpgsql
pg_restore: setting owner and privileges for COMMENT EXTENSION plpgsql
pg_restore: setting owner and privileges for TABLE t_address
pg_restore: setting owner and privileges for SEQUENCE t_address_i_id_addr_seq
pg_restore: setting owner and privileges for SEQUENCE OWNED BY t_address_i_id_addr_seq
pg_restore: setting owner and privileges for TABLE t_city
pg_restore: setting owner and privileges for SEQUENCE t_city_i_id_city_seq
pg_restore: setting owner and privileges for SEQUENCE OWNED BY t_city_i_id_city_seq
pg_restore: setting owner and privileges for DEFAULT i_id_addr
pg_restore: setting owner and privileges for DEFAULT i_id_city
Again the pg_restore loads the objects with the ownership and privileges. What's missing is the constraints creation. The second step is the data section's load.
postgres@tardis:~/dump$ pg_restore --section=data -v  -d db_addr_restore_bin db_addr.dmp 
pg_restore: connecting to database for restore
pg_restore: implied data-only restore
pg_restore: processing data for table "t_address"
pg_restore: executing SEQUENCE SET t_address_i_id_addr_seq
pg_restore: processing data for table "t_city"
pg_restore: executing SEQUENCE SET t_city_i_id_city_seq
pg_restore: setting owner and privileges for TABLE DATA t_address
pg_restore: setting owner and privileges for SEQUENCE SET t_address_i_id_addr_seq
pg_restore: setting owner and privileges for TABLE DATA t_city
pg_restore: setting owner and privileges for SEQUENCE SET t_city_i_id_city_seq
This section simply loads the table's data and sets the sequence values. Apart for the ownership no further action is performed. Finally we'll run the post-data section.
postgres@tardis:~/dump$ pg_restore --section=post-data -v  -d db_addr_restore_bin db_addr.dmp 
pg_restore: connecting to database for restore
pg_restore: creating CONSTRAINT pk_i_id_city
pg_restore: creating CONSTRAINT pk_id_address
pg_restore: creating FK CONSTRAINT fk_t_city_i_id_city
pg_restore: setting owner and privileges for CONSTRAINT pk_i_id_city
pg_restore: setting owner and privileges for CONSTRAINT pk_id_address
pg_restore: setting owner and privileges for FK CONSTRAINT fk_t_city_i_id_city
With this run the constrains (and eventually all the indices) are created in the best approach possible when dealing with the bulk data processing.

Loading the data contents without indices maximise the speed. The constraint and index build with the data already in place results in a faster build and a fresh index without any bloat.

Wednesday, 6 August 2014

Chapter 10 intro and part 1. restoring with plain format

Yes I know, the previous chapter was number 8, this is number 10. 
The reason why is I realised I forgot completely to talk about the constraints so I've added a data integrity  chapter just after the the logical layout and the numbers shifted. 
Anyway the pdf on slideshare is updated with the latest version.

Restore

There's little advantage in saving the data if the recover is not possible. In this chapter we'll take a look to the fastest and safest way to restore recover the saved dump.
The backup format determines which program will be used for the restore. We'll take a look first on the restore from plain format. Later we'll see how the custom and directory formats are the best choice, giving flexibility and performance at restore time. Finally we'll see how to improve database performances at restore time sacrificing temporarily the reliability.

The plain format

As seen in 9 the pg_dump by default saves the entire database in plain format. This is an SQL script offering nothing but a straightforward reload strategy. Feeding the saved file into psql rebuilds completely the objects.
This format have few advantages. For example it's possible to edit the statement using a common text editor. This of course if the dump is reasonably small. Even loading a file with vim when its size is measured in gigabytes becomes a stressful experience.

The data is saved by default in the copy format. This guarantee the best performances at load time. It's still possible to save the data using the inserts but this will result in a very slow restore, having each statement to be parsed and planned.

Saving the schema and data in two separate files requires also an extra care at dump time. Restoring from a data only plain backup will very likely result in tables with foreign keys having their data missing because the key violation.

In order to avoid the problem, at backup time and when running a data only backup, the switch -disable-triggers should be used. This will emit the DISABLE TRIGGER statements before the data load and the ENABLE TRIGGER after the data is consistently restored. The following example will show a dump reload session with the separate schema and data save.
Let's create the simple data structure. We'll create a new database with a table for the addresses and another one for the cities. Between the cities an the addresses a foreign key will enforce the relation on the id city column.


Now let's put some data into it.


We'll now execute two dumps one for the schema and one for the data without the disable triggers switch.

postgres@tardis:~/dmp$ pg_dump --schema-only db_addr > db_addr.schema.sql
postgres@tardis:~/dmp$ pg_dump --data-only db_addr > db_addr.data.sql

Looking to the schema dump it's quite obvious what it does. All the DDL are saved in the correct order to restore the same database structure .
The data is then saved by pg_dump in the correct order for having the referential integrity guaranteed. In our very simple example the table t_city is dumped before the table t_address. This way the data will not violate the foreign key. In a scenario where a complex structure is dumped, this cannot be guaranteed. Let's run the same dump with the option -disable-trigger.

postgres@tardis:~/dmp$ pg_dump --disable-triggers --data-only db_addr > db_addr.data.sql

The copy statements in this case are enclosed by two extra statements for disabling and re enabling the triggers.


This way the FOREIGN KEY's triggers with any user defined trigger, will be disabled during the restore, ensuring the data will be safely stored. After the restoration the enable will restore any constraint enforcement.

The data saved in plain format is then restored using the command line client psql.
Let's then create a new database and restore it the saved dumps, first schema and then the data.


Friday, 1 August 2014

Chapter 8's final two parts. pg_dumpall and the export's validation

pg_dumpall

The pg_dumpall program is mostly a wrapper for pg_dump. It's usage is mainly for dumping all the databases in the cluster. Having lesser options than pg_dump is also less flexible. However one option is absolutely useful and should be included in any backup plan to ensure a rapid recovery in case of disaster.
The -globals-only option saves on the standard output all the cluster wide options like the tablespaces, the roles and the privileges. The passwords are dumped as well encrypted in md5 format. The dump format for this utility is only text. The best way to save the globals is to specify the -f option followed by the file name. This file can be loaded into an empty cluster to recreate the global objects. The tablespaces, if any present, must have the filesystem already in place before running the sql as PostgreSQL doesn't create the filesystem structure.

This example shows the program call and the contents of the output file.
postgres@tardis:~/dmp$ pg_dumpall --globals-only -f main_globals.sql
postgres@tardis:~/dmp$ cat main_globals.sql 
--
-- PostgreSQL database cluster dump
--

SET default_transaction_read_only = off;

SET client_encoding = 'UTF8';
SET standard_conforming_strings = on;

--
-- Roles
--

CREATE ROLE postgres;
ALTER ROLE postgres WITH SUPERUSER INHERIT CREATEROLE CREATEDB LOGIN REPLICATION;


--
-- PostgreSQL database cluster dump complete
--

postgres@tardis:~/dmp$

Backup validation

There's little advantage in having a backup if this is not restorable. The corruption danger is at various levels and unfortunately the problem appears only when the restore is needed.
The corruption have many causes. If the dump is saved locally a damaged filesystem can hide the problem meanwhile the corrupted block is not read. Also the disk subsystem with undetected problems will result in a silent corruption. In order to limit this kind of problems the filesystem of choice should be a solid one with strong journaling support.

The disk subsystem should guarantee the data reliability rather the speed. Slow disks when backing up the data, in particular if in the compressed format don't limit the speed, being the cpu power the real bottleneck.
If the dump file is transferred over the network is a good idea to generate a md5 checksum to check the file integrity after the transfer.

All those measures don't give the security the backup is restorable. The only test capable to ensure the backup is good is a test restore on separate server. This can be a single test or a more structured check. Which strategy to adopt is determined by the amount of data, the time required for the restore and the backup schedule.

The general purpose databases, which size is measurable in hundreds of gigabytes, the restore can complete in few hours and the continuous test is feasible. For the VLDB, which size is measured in terabytes, the restore can take more than one day, in particular if there are big indices requiring expensive sort on disk for the build. In this scenario a weekly restore gives a good perception if there are potential problems with the saved data.

Sunday, 27 July 2014

Chapter 8 - part 3, under the bonnet. With a bonus


Snapshot exports

Since PostgreSQL 9.2 are supported the transaction's snapshot exports. A session with an open transaction, can export its consistent snapshot to any other session. The snapshot remains valid meanwhile the transaction is open. Using this functionality offers a way to run multiple backends on a consistent data set frozen in time. This feature resulted in the brilliant parallel export in the 9.3's pg_dump as described in 8.3.
In the following example, let's consider the table created in 5.5. We'll first start an explicit transaction and then we'll export the current snapshot.


 We are first starting a transaction with the REPEATABLE READ isolation level. The second statement exports the current snapshot using the function pg_export_snapshot(). Finally we are checking with a simple row count the table t_data have data inside.

We can now login with in a different session and delete all the rows from the t_data table.


With the table now empty let's import the snapshot exported by the first backend.


The function pg_export_snapshot saves the current snapshot returning the text string which identifies the snapshot. Passing the string to clients that want to import the snapshot gives to independent sessions a single consistent vision. The import is possible only until the end of the transaction that exported it. The export is useful only in the READ COMMITTED transactions, because the REPEATABLE READ and higher isolation levels use the same snapshot within their lifetime.


pg_dump under the bonnet

The pg_dump source code gives a very good picture of what exactly the backup software does. The process runs into with fixed transaction's isolation level accordingly with the server's version. The distinction is required because, becoming PostgreSQL more sophisticated at each major release, the isolation levels became more and more strict with their meanings.
More informations about the transactions are in 5.7.
From PostgreSQL 9.1 the transaction serializable became a real serialisation. The transaction's behaviour offered by the serializable in the version up to 9.0 were assigned to the REPETABLE READ transaction's isolation, its real kind. The SERIALIZABLE transaction's isolation level is still used with DEFERRABLE option when pg_dump is executed with the option -serializable-deferrable as seen in 8.1.3. The switch have effect only on the remote server with version 9.1 and later. The transaction is also set to READ ONLY, when supported by the server, in order to limit the XID generation.

Table 8.1: pg_dump's transaction isolation levels
Server version Command
>= 9.1 REPEATABLE READ, READ ONLY
>= 9.1 with -serializable-deferrable SERIALIZABLE, READ ONLY, DEFERRABLE
>= 7.4 SERIALIZABLE READ ONLY
<7.4 SERIALIZABLE

From the version 9.3 pg_dump supports the parallel dump using the feature seen in 5.7.1. As the snapshot export is supported from the version 9.2 this permit a parallel dump from the older major version if using the newer backup program. However, pg_dump accepts the option -no-synchronized-snapshots in order to dump in parallel jobs from the older versions. The data is not supposed to be consistent if there are read write transactions during this kind of export. To have a consistent export in this case all the transactions which modify the data must be stopped meanwhile the export is in progress.

When exporting in parallel the only permitted format is the directory. The pg_restore program since the version 9.3 supports also the directory format for the paralelle data restoration. The combination of the parallel jobs backup and the parallel jobs restore, can improve massively either the backup and the recovery speed in case of disaster.